Menus and Toolbars
FILE Menu

New - Click on New and follow the arrow for New things that can be created.
Acquire Image - Click here to link an image to a job or file.
Preferences - This will open the User Preference box where the user can make changes to the appearance of RBS. (See above for details).
Exit - This will close you out of RBS.
LIST Menu
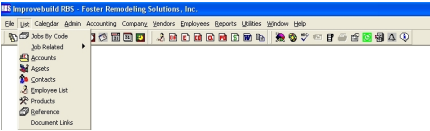
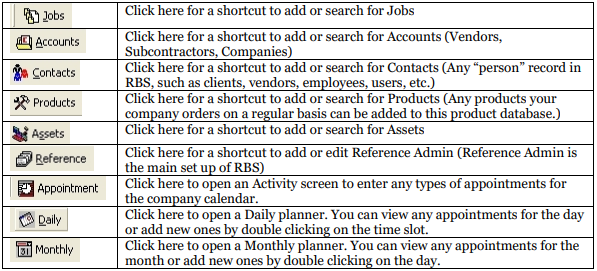
Jobs by Code - Click here for a screen which will allow you to search for jobs using certain criteria. Search by Department, House Type, Lead, etc.
Job Related - Click on the arrow to search for things related to a job.
Accounts - Click on Accounts and a search screen will appear. You can search for accounts based on different criteria. You can also add a new Account from this window.
Assets - Click on Assets and a search screen will appear. You can search for assets based on different criteria. You can also add a new Asset from this window.
Contacts - Click on Contacts and a search screen will appear. You can search for contacts based on different criteria. You can also add a new Contact from this window.
Employee List - Click on Employees and a search screen will appear. You can search for employees based on different criteria. You can also add a new Employee from this window.
Products - Click on Products and a search screen will appear. You can search for products based on different criteria. You can also add a new Product from this window.
Reference - Click on Reference and the Reference Admin screen will appear. This is where you can view entries in the database.
Document Link - Click on Document Link to pull up a search screen. You can search for any linked document by document type.
CALENDAR Menu
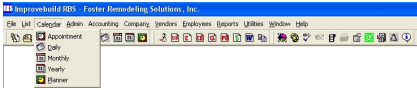
Appointment - This will open an activity screen. You can enter an Appointment/Activity to put on the calendar or you can attach the activity to a specific job.
Daily - This will open a daily scheduler. Here you can add or view any activities scheduled for that day.
Monthly - This will open a monthly scheduler. Here you can add or view any activities scheduled for that month.
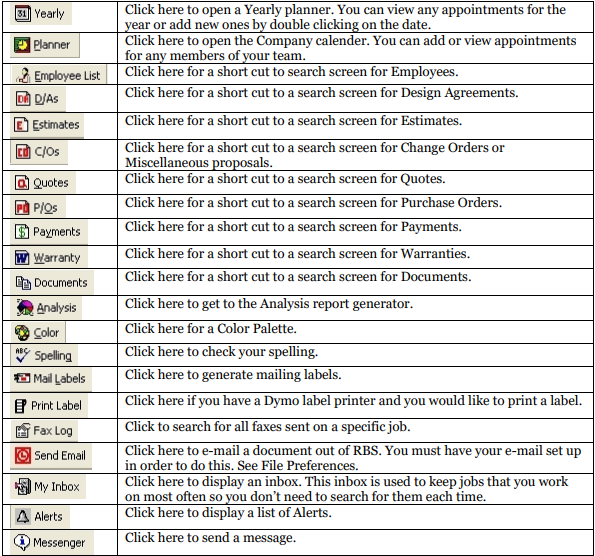
Yearly - This will open a yearly scheduler. Here you can add or view any activities scheduled for that year.
Planner - This will open the entire scheduling function. Here you can view any activities scheduled
ADMIN Menu
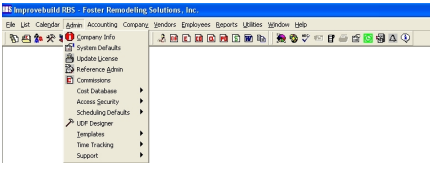
Company Info - This is where you go to add or edit your company information. (See Set Up Company Info for details).
System Defaults - This will bring up a list of system defaults.
Update License - This is where you will go to add additional licenses to your ImproveBuild Remodeler’s Business Solution 3
Reference Admin - This is where you set up the records in the database.
Commissions - Click on Commissions and a search screen will appear. You can add a new commission or search for commissions based on different criteria.
Cost Database - Click on Cost Database to set up your costs, map categories, link categories by action verb and update costs.
Access Security - This is where you will set up your Users and User Groups.
Scheduling Defaults - You can separate categories and costs by color using this function.
UDF Designer - Click on this and a box will appear that will allow you to define User Defined Fields.
Templates - Click here to set up or change the pre-set templates.
Time Tracking - This will be used as part of the accounting function. You will be able to track time worked on jobs by each employee.
Support - You will only use this function if you are contacted by an ImproveBuild representative about modifying your database.
ACCOUNTING Menu

VIEW COMPANY INFO

VENDORS Menu

Vendor List - This is another way you can search for an Account/Company (vendor, subcontractor, etc.) Click here to bring up a search menu.
Add vendor products Click here to view products under a specific vendor.
EMPLOYEES Menu

Weekly Timesheet - Click here for time tracking. You can create a timesheet for each employee for job costing purposes.
Commission Request - Click on Commission Request and a search box will appear. You can search for commissions on a specific employee. Click OK to view all commission requests.
Change Password - This is where each employee can change their password.
Change e-mail address - Click here to add or change employee e-mail address. This will give you the ability to e-mail through RBS.
My Inbox - Click here to show any jobs you moved to your In-Box
Employee List - This will bring up a search box. Click OK to view all employees or search by any of the listed criteria
REPORTS Menu
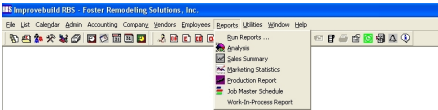
Run Reports - This will bring up a Generate Report screen. Choose the reports you would like to run and click OK to print reports.
Analysis - Click on Analysis to bring up a screen that will allow you to create reports. Click on the drop down boxes to design your analysis.
Sales Summary - This function can print several different reports designed around your salespeople.
Marketing Statistics - This function can generate several different reports based on the Referral Source field from the General Screen.
Production Report - This function can generate several different reports based on your lead carpenter.
Job Master Schedule - This is where you can view a master job schedule of all jobs.
Work In Progress Report - Click here to create a WIP report.
UTILITIES Menu
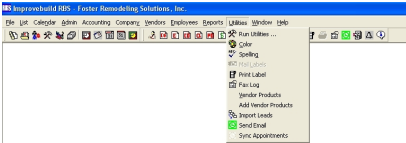
Run Utilities - Click here to open a screen where you can run utilities.
Color Click on Color to open a color palette.
Spelling - Click on spelling to activate the spell check feature.
Mail Labels - Click on Mail Labels to print out mailing labels for a list of customers. You must first do a search and select a group to do a mailing to. Once the search screen returns the results, mailing labels can be generated.
Print Label - Click on Print Label to print a single label from a DYMO label maker.
Fax Log -This will open a log that will tell you that status of faxes received and sent through the fax server.
Import Leads - This is where you can import lists of “Leads” from other sources.
Sent E-mail - Click here to send an e-mail from RBS.
Sync Appointments - Click here to Sync appointments from RBS to Outlook.
WINDOWS Menu
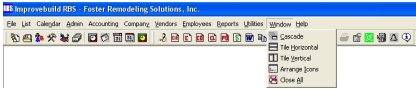
Cascade - Click on this to cascade the windows within RBS
Horizontal - Click on this to arrange your windows horizontally
Vertical - Click on this to arrange your windows vertically
Arrange Icons - Click on this to arrange your icons
Close All - Click on this to close all open windows within RBS
HELP Menu

On-line Help - Click here to get help
About - Click here to view a splash screen about ImproveBuil
Short-Cut buttons on toolbar