CO-MP Tab
RBS allows you to keep track of each Change Order on a job. There is also the functionality to write small Miscellaneous Proposals for things such as Painting jobs or Interior Design work. You will create these documents in another section (see Setting Up Templates and Reference Admin). Once these documents have been created and mapped, they will be available for use in this tab.
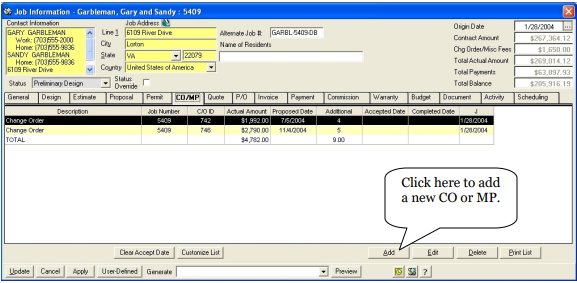
The ADD CO/MP detail form will be displayed for data entry.

CO – MP Type - Select the Type of CO/MP.
Proposed Date - This will default to today’s date but can be edited
Department - Click on the drop down to choose a Department for this document.
Admin/Install Fee - If you charge a fee for this, you can enter it here.
Proposal ID - This will be automatically generated by the system when this is saved.
Reference Number - You can enter a reference number if needed
Job Info - The system will automatically populate this information from the General tab.
Job Number - The system will automatically populate this information from the General tab.
Proposal Amt - Enter the amount of the change order or miscellaneous proposal
Sales Tax Amount - If you charge a sales tax it can be entered here
Total Amount - This field will automatically calculate based on the other amounts
Credit Design Fees - Click here if you credit your design fees back to the job
Deposit Amt - If you are requiring a deposit, enter it here.
Drawing Date - Enter the date the drawings were done
Additional Days - RBS will automatically calculate the additional days based on price
Salesperson 1 - Automatically filled in from the General tab.
Salesperson 2 - If salespeople are sharing the job, you can add an additional salesperson here
Accepted Date - Once you know the accepted date, you can fill it in here, this will also generate an invoice for the change order.
Completed Date - Once the Change Order has been completed, you can enter the date here.
Description - You can enter a brief description of the change order here.
Proposal Items and Notes - Enter the details of the change order or miscellaneous proposal here.
Use Estimate - Click here to pull an estimate from the Estimate tab
Proposal Items and notes: You can manually type your proposal items in this box. Double click on this box to produce a larger box to type details in. If you have revised your estimate to reflect this change order you can click on the “Use Estimate” button. This option will bring the entire contents of your estimate into the change order screen. Double click on the box for an expanded view. You will then need to delete any part of the estimate that you do not want to add to your change order. Then click OK. Also, be sure to adjust the Change Order Amount accordingly.
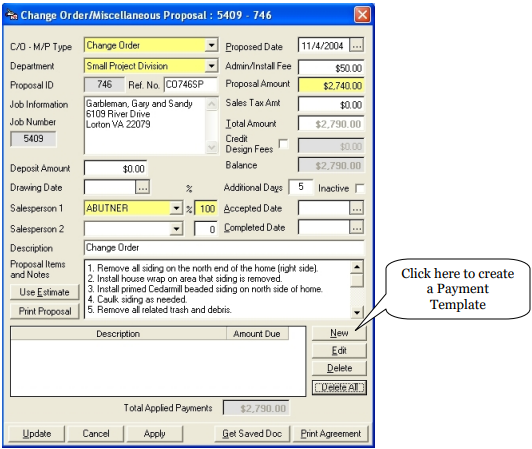
To set up a payment template to go with this contract, click on New and a Payment Template box will appear. (These payment templates have been previously set up. See “Setting up Payment Templates” for more details.)
Select a template from the list.
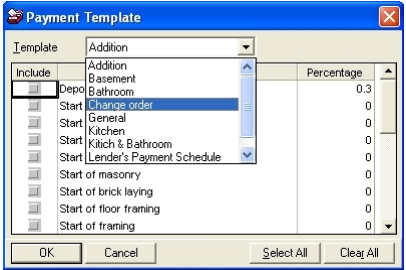
Click on “Select All” to select each item on a list or click each item separately.
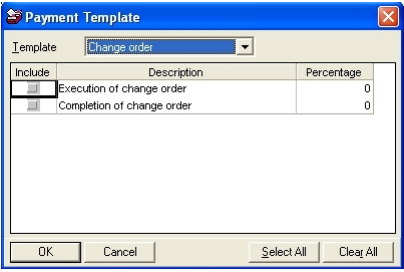
Click the OK button to add the items.
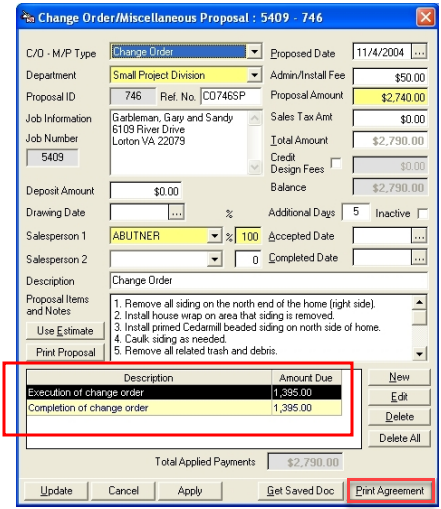
Items will appear in the Payment grid and payments will be equally calculated between each stage of the job.
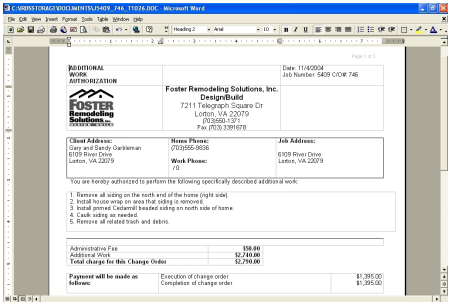
Click on the PRINT AGREEMENT button to preview and print the generated document.
Click on the UPDATE to save all changes,