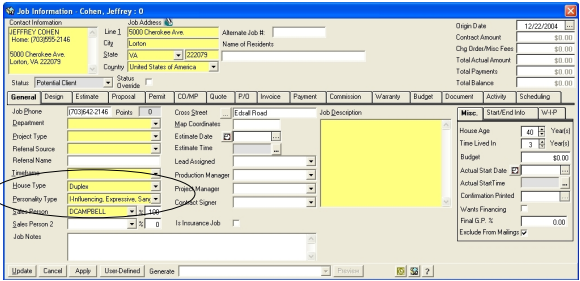
General Tab
The General Tab is where you will keep track of all of the General Information on a job. This tab includes information such as, Job Contact information with
- Names,
- Addresses
- Phone numbers
- Email addresses
- Job Address
- Project Type
- Referral Source
- Job Description
- Map Coordinates
- Budget,
- Important Dates and much more.
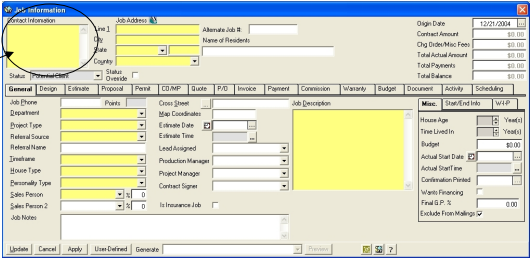
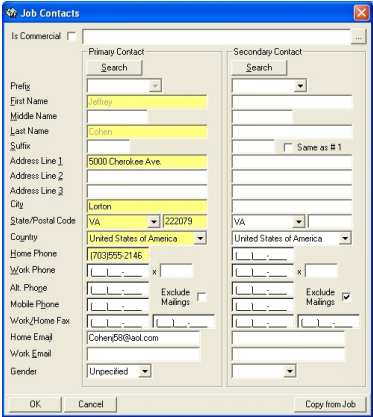
Doublclick on the Contact Information field to display the Contacts form.
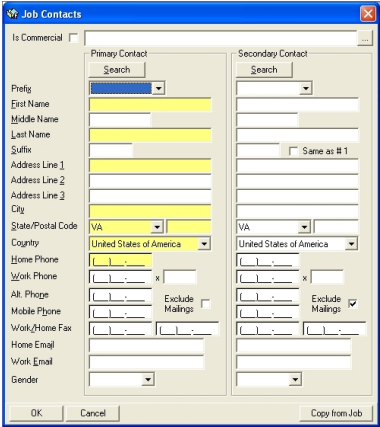
Enter all the required (mandatory entry) fields and click OK button to save. The secondary contact is optional.
Click on the COPY FROM JOB button to retrieve the information from a previous job for an existing client. A search form will be displayed to find the desired job and contacts.
Status This field will be automatically populated. This status will automatically be updated based on components entered throughout the job.
Status Override If you would not like the status of the job to be automatically updated click on this button to override the function.
Job Phone Automatically populates from the Contact Information
Points Points will be automatically assigned to a job so a job can be rated for level of importance. Points are tagged to a few specific fields. We assigned some points in the database but you can add, edit or delete them. Check the end of the “General” section for more details.
Department If you have more than one department within your company, you can assign jobs to that department. (Example: Handyman division, Design/Build, Design Only, Retail Sales, etc.
Project Type This field will assign a project type. Make a choice from the predetermined list of Project Types. (Example: Addition, bathroom, kitchen, basement, etc.) Rating Points will be assigned based on this field.
Referral Source Enter who referred this client to you. Make a choice from the predetermined list of Referral Sources. Rating Points will be assigned based on this field.
Referral Name You can enter the Name of the specific person that referred the client to you.
TimeFrame Enter the timeframe in which the client would like to begin the project.
Rating Points will be assigned based on this field.
House Type Enter the type of house the client is calling about. Make a choice from the predetermined list of House Types.
Personality Type Enter the personality type of the caller. Make a choice from the predetermined list of Personality Types. This will be helpful to your sales staff when they make their initial call.
Sales Person 1 Enter the name of the salesperson for the job.
Percentage of Sales Enter the percentage of the sale for this salesperson .
Sales Person 2 If there is a secondary salesperson on the job you can add another salesperson here.
Percentage of Sales Enter the percentage of the sale for this salesperson.
Job Notes Enter any notes you may need to keep track of things on this job
Cross Street Enter a cross street so the staff can locate the house. Or, click on the button with the dots and RBS will launch into Mapquest to print out directions to your job site.
Map Coordinates You can enter Map Coordinates from an Atlas here.
Estimate Date We use this field as the date the Salesperson will first meet with the client. This must be filled in if you want a date to print on the Confirmation Letter. Click on the box with the dots to see a calendar and choose a date.
Estimate Time This is the time a salesperson is scheduled to meet with the client for the first time. Click to see a clock and choose a time.
Lead Assigned Click on the drop down to choose the employee who will be the Lead Carpenter assigned to this job
Production Manager Click on the drop down to choose the employee who will be the Production Manager assigned to this job
Project Manager Click on the drop down to choose the employee who will be the Project Manager assigned to this job.
Contract Signer Click on the drop down to choose the employee who will be the Contract Signer for this job.
Insurance Job Click this box if this is an insurance job. (this can be reported on later)
Job Description Type a job description for this job. You can double Click on this field to make a bigger area for typing.
Misc. Tab
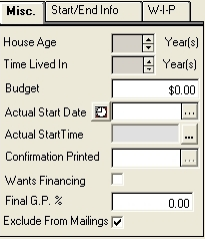
House Age Enter a House age for reference
Time Lived In Enter the number of years the client has lived in the house
Budget Enter the clients budget
Actual Start Date You will come back later and enter the actual start date of the project.
Actual Start Time You will come back later and enter the actual start time of the project
Confirmation Printed If you print a Confirmation letter, the program will enter the date the letter was printed.
Wants Financing Check here if your client wants a financing plan.
Final GP % When a job is complete you can enter your final gross profit on the job. This can be used later for reporting purposes.
Exclude from Mailings If you do not want this client to appear on Mailing Lists, then click the box.
Start/End Info Tab
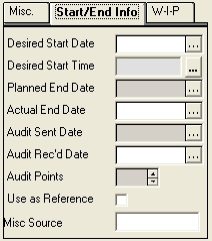
Desired Start Date - Enter the start date your client would like.
Desired Start Time - Enter the start time your client would like.
Planned End Date - Enter the date you plan to finish the job.
Actual End Date - Enter the actual end date of the project.
Audit Sent Date - Enter the date when the audit letter was sent.
Audit Rec’d Date - Enter the date when the audit respose arrived.
Audit Points - Enter the total audit points from the response.
Use as Reference - Check this box if the client has agreed to be a reference
Misc Source - nter any additional info on the source.
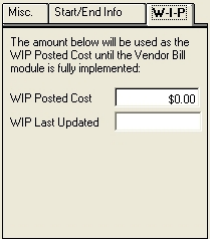
Work-in-Process (WIP) Tab
Generate/Print various documents by selecting the desired item from the drop down
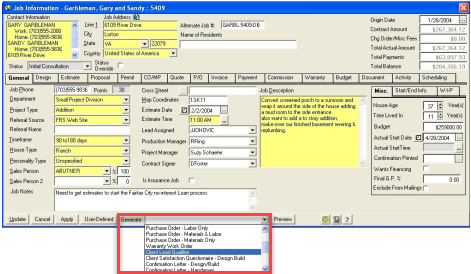
Send Contact to Outlook using the button circled below.

Printing Letter and Labels
After you are done with all of the General Information you can click on Apply to Save the job. You can also click on Update. Update will save the job and close you out of it. If this is the first time you have Updated on this job a Generate Output screen will appear to allow for the printing of letters and labels.
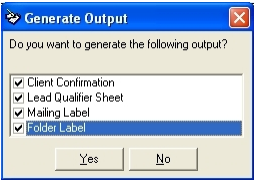
User can select any of the select documents and labels (in order to print the labels you must have the DYMO label writer.) If you would like to print all of these things, click on Yes and these letters and labels will be automatically generated. If you would not like to print some of the things then uncheck whatever you do not want to print. If you do not want to print anything at this time, click No and nothing will print. You will be prompted to print these things each time you save until they are either printed or unchecked.
Points Rating System
RBS has a built in Points Rating System. The points can be used to rate prospective jobs. Points are assigned in Reference Admin. The system will automatically add the points based on specific criteria entered. The higher the number the better potential the job will be. Points are attached to the Project Type, Postal Code, Referral Source and TimeFrame fields.
To set up your own points system, go to Reference Admin, click on one of the above named fields and go to edit, to edit the point values.
Creating a New Job using an Existing Client
RBS gives you the ability to create a new job using existing client information without having to re-enter the information. For example you may be have done a project for a client in the past and now they would like some more work done. Instead of having to re-enter their information again, you can Copy it from the previous job.

1. Click on the Jobs Icon from the toolbar. A search screen will appear.
2. Click on New to enter a New Job. A Job Information screen will appear.
3. Double click in Contact Information. This will bring up the Job Contact screen. Click on
the “Copy from Job” button at the bottom of the screen.
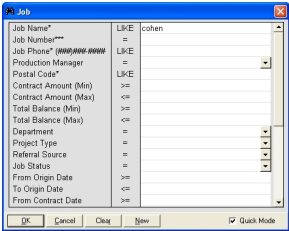
A Job Search window will appear. Type in any of the Client criteria to search for that previous job. You can enter the client name, the old job number, the client phone number, client postal code, etc.
Click OK to start the search.
RBS will do a search and a window will appear with the search results
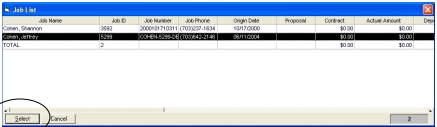
Click on the Client that you would like to copy. Then click on Select.
RBS will automatically fill in the Client information that was in the last job. You can update this information if it has changed and save it. When done, click OK.
This will return you to the Job Information screen. Notice it will also pull some other fields from the previous job. You can also make changes to this information if needed and save the changes for the current job.