Design (Agreement) Tab
The Design Tab can be used to keep track of different design phases done for your clients. A few examples are Design Agreements, Design Feasibilities and Partner Plans.
The different types of design phases can be configured to fit how you do business. (To make changes to the Design Types see Setting Up Reference Admin). To set up a new Design phase, see the following steps.
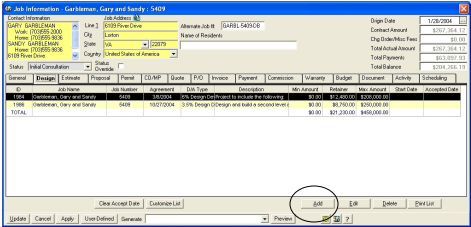
The design tab will display all design agreements or partner plans for the job.
Click the ADD button to create a new record. An ADD form will be displayed.
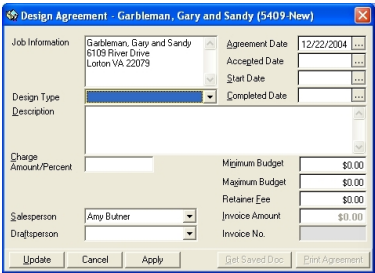
Fill in the information to create a new record.
Job Information - The program will automatically fill this information in.
Job Number - The program will automatically fill this information in.
Design Type -Click on the drop down box to choose a Design Type. (These Design Types along with the fees are set up in the database. See Setting up Reference Admin for more details.)
Agreement Date - The program will automatically fill in today’s date
Accepted Date - Once a Design is accepted, enter an accepted date here. Once an accepted date is entered, an invoice will be generated. See below.
Start Date - Enter the Start date of the design
Completed Date - Enter the End date of the design
Description - Type a description of the project. Use as much detail as needed.
Charge Amount/Percent - The program will automatically fill this information in. This is the fee that has been previously set up in the database.
Minimum Budget - Enter the Minimum budget (Design Only)
Maximum Budget - Enter the Maximum budget (Design Only)
Retainer Fee - The program will automatically fill this information in. This is the fee that has been set up in the database.
Invoice Amount - The program will automatically fill this in.
Invoice Number - The program will automatically fill this in.
Salesperson - Select the sales person from the dropdown.
Draftsperson - Select the draftsperson from the dropdown.
Click on th APPLY button to save the record and remain on the form.
Click on the PRINT AGREEMENT to generate the saved Design Agreement.

Click on the UPDATE button to save the record and close the form.
Accepting a Design Agreement
Once the Design Agreement is accepted, you can go in and enter an Accepted Date. Once you enter an Accepted Date an invoice can be generated. Enter an Accepted Date and click on Apply.
